© 2011 Thomas K. Sharpless
Panini-Pro is an interactive tool for adjusting the perspective of ultra-wide-angle digital images. It re-renders an existing image in a new customizable projection, showing the result at high resolution in real time. It has many controls, designed to solve specific pictorial problems. The effect of every adjustment is immediately visible, so a good eye is really all you need to get a good result.
Panini-Pro begins by mapping the source image onto a sphere, that represents the projected view of the world in all possible directions – the panosphere. Thus all images, from single photos to full spherical panoramas, are seen the way the camera originally saw them, and rendering a view with Panini-Pro is like re-photographing it with a highly capable software view camera.
The main purpose of Panini-Pro is making natural looking perspective images; however it can also produce a range of fanciful perspectives, including the wide circular views popularly called “little planets”.
As a professional tool, Panini-Pro is designed to allow as much as possible, rather than prevent you from doing anything silly. So it is possible, and generally harmless, to give Panini-Pro logically inconsistent – even absurd – commands.
Panini-Pro has no conventional menu bar, but it does have menus, that pop up when you click these tool buttons:
![]() Help menu, with
Help menu, with
About box, that identifies the build and license terms
Mouse help, that shows how the mouse can control the view
Keyboard help, that describes numerous commands and shortcuts
Size limits tuner, sets maximum loaded image sizes to suit your hardware.
![]() File menu, with
File menu, with
Load picture
Save view
Save project
Load project
To load a new picture, you can drag and drop an image file on the program icon or the window of a running copy; or use the File menu. It can be a normal or fish-eye photo, a panorama in any popular flat format, a cubic QTVR or a group of separate cube face files. Panini-Pro can recognize or guess the projection of some file types, for others it needs you to specify some projection parameters. Panini-Pro only handles 8 bits per color, but will load 16-bit tiffs at 8 bits.
The newly loaded image may not be upright on the sphere. If not, use the source alignment controls to align the world vertical with the reference grid. That requires adjusting both roll and pitch angles, because the source is no longer flat – it is now “painted” on the 3-dimensional panosphere. The roll control can turn photos up to 120 degrees either way.
To save the displayed picture, use the File menu or press the Ctrl+S keys – 'Splat'+S on the Mac. A dialog will pop up that lets you choose the output file location and name. Format is set by the file name extension you enter (jpeg by default; tiff and png are also supported).
If you start Panini-Pro by clicking on its icon instead of dropping a file, it displays a cube with edges outlined and labels on the faces. This can be helpful for learning to operate the viewing controls.
Eight parameters simply frame the view, without changing its perspective:
Screen window width and height set the shape of the frame
Horizontal and vertical shifts move the projected image relative to the frame
Zoom changes the size of the image relative to the frame
Yaw and pitch position a spot on the image at the center of the frame
Roll rotates the view around the center of the frame
Seven more parameters actually reshape the image:
Compression adjusts the scale of horizontal angles; it is the strongest parameter
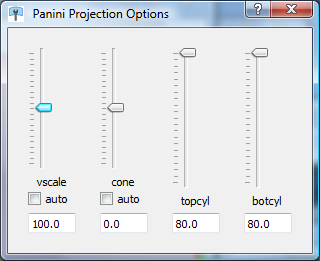
Vertical scale adjusts the overall height to width ratio
Swing and tilt incline the focal plane with respect to the optical axis, as in a view camera
Upper and lower cylinder heights stretch the sphere more or less into a vertical cylinder. That changes stereographic projections into Panini projections.
Cone angle inclines the sides of the cylinder and deforms the ends of the sphere. That can straighten leaning walls when the view is pitched up or down a little, and change center /side proportions in “little planet” views.
As an aid to aligning views and adjusting projections, Panini-Pro can draw a grid of straight lines on the 'focal plane' of the view – that is, the screen window. The G key turns this grid on and off; you can also adjust the spacing between lines and their color. Details below.
Panini-Pro can also draw a reference grid on the surface of the panosphere. This takes the familiar form of the lines of latitude and longitude on a globe map of the world. It is displayed when the source alignment tools are active, or when you click the tool button that resembles a lat/lon grid.
All parameters are controlled by sliders that look like this
Besides dragging the slider you can
type numbers in the number box, or click on it and 'spin' it in small steps with up/down arrow keys. That is the best way to make fine adjustments.
double-click on the label to reset the default value
click the check box to set or clear an option
The sliders respond to changes made by other means, for example with preset views or the mouse.
These main window tool bar buttons show or hide slider control windows.
|
|
|
Controls to align source image on panosphere |
|
|
|
Basic viewing controls (yaw, pitch, zoom, compression) |
|
|
|
Advanced view options (vertical scale, cone angle, cylinder heights) |
|
|
|
View camera motions ( H and V shifts, roll, swing, tilt) |
|
|
|
Spot shaping effects (described below) |
|
|
|
Sector shaping effects (described below) |
Other tool bar buttons:
|
|
|
Dialog to set the source projection and edit camera/lens database |
|
|
|
Toggles display of latitude/longitude grid |
In the main window, the mouse controls certain view parameters depending on what combination of mouse buttons and modifier keys you hold down.
|
|
Modifier key |
left button |
right button (Ctrl on 1-button Mac) |
|
|
none |
yaw / pitch view direction |
compression / zoom |
|
|
Shift |
H / V framing shifts |
– / Roll |
|
|
Ctrl (Command on Mac) |
compression / zoom |
Compression / – |
|
|
Alt |
swing / tilt |
– / Zoom (vert) |
Notice that in some cases – for example framing shifts – the mouse 'drags' the controlled quantity, while in others – for example yaw and pitch – it controls the rate of change.
With the same modifier keys, the arrow keys control the same pair of parameters as the left mouse, and the Home key resets those two parameters. In addition, Ctrl+Alt+Home resets all view parameters to their default values, even those that are not under mouse control.
These commands are available when the image display window has focus (i.e. after you click in it). Note 'Cmd' means the Command key on Mac, the Ctrl key on Windows or Linux.
File Operations
|
|
Cmd+O |
Load a new picture |
|
|
Cmd+S |
Save the view |
|
|
Cmd+P |
Save a project file |
|
|
Cmd+L |
Load a project file |
Preset Views
|
|
P |
standard Panini view: full cylinder height, cmpr 100 |
|
|
O |
standard stereographic view: sphere, cmpr 100 |
|
|
L |
rectilinear view: cmpr 0 (sphere or cylinder) |
|
|
U |
superfish view: sphere, cmpr 130, zoom -30 |
Special Effects
|
|
I |
display source image, if not cubic |
|
|
Cmd+W |
toggle wire frame view of panosurface mesh |
|
|
G |
toggle reference grid overlay |
|
|
Shift+G |
make the grid square (at current H spacing) |
|
|
Alt+G |
step through grid colors |
Arrow and Home Keys
|
|
modifier |
selects this pair of parameters |
|
|
none |
Yaw and Pitch |
|
|
Shift |
H and V framing shifts |
|
|
Cmd |
Compression and Zoom |
|
|
Alt |
Swing and Tilt |
Arrow keys change the selected parameters, Home key resets them to default values. Cmd+Alt+Home resets all view parameters at once.
The Panini projection keeps vertical and diagonal lines straight, but transverse horizontal lines are curved, most noticeably so at top and bottom center. When that makes part of the picture look unnatural, Panini-Pro's multi-perspective tools may be able to create a better perspective illusion. There are two kinds of perspective tools, “spot” and “sector”, 4 instances of each kind are available.
These tools change the projection within a limited region, in ways that can make the curved lines look straighter – or more curved. Using them you can make a “multiperspective projection” custom fitted to your image.
The spot tools are good for reshaping large areas without well defined boundaries. The sector tools allow more precise boundary definition, in particular their edges can be aligned along straight lines in architectural scenes.
Each shaping tool has its own button, its own color, and its own controls. To keep the screen cleaner Panini-Pro lets you adjust only one spot and one sector at a time.
When you click a spot tool button Panini-Pro shows its control window, and the tool outline – in this case, a green circle – appears on the image. The circle is actually drawn on the panosphere, so its shape will change according to position and view settings.
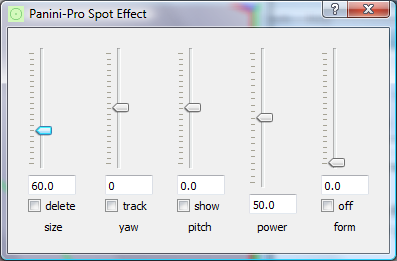
The yaw and pitch sliders position the tool; size changes its size; power adjusts the strength of the effect and form modifies its form. Checking the “off” box switches the effect off without deleting the settings.
When you close the control window, or click the same tool button again, the outline is hidden (unless you have checked the show box) but the effect remains active. Active tool buttons have a colored background as a reminder. To remove an effect (even if you have not made any adjustments) you must click the “delete” box; the tool button background becomes white showing it is inactive.
Checking the track box keeps the tool at window center by changing view yaw and pitch. Caution: if you leave this checked when closing the window, it will happen again when you re-open it.
Within the spot, the surface of the panosphere is pulled in or pushed out according to the power parameter. At power = 100 the result is a flat spot on the sphere. Power > 100 makes a dent, and power < 0 makes a bulge outside the original surface of the sphere. The form parameter controls the direction in which surface point move: at form = 100 they move along radii of the sphere, at form = 0 all points move parallel to the radius at spot center.
A sector tool reshapes the area between two arcs on the panosphere. Depending on their placement and your point of view, the arcs may look like the edges of a lens or a citrus segment, or like two parallel straight lines that meet at “vanishing points” on opposite sides of the world. To see the true 3D shape of this tool, use the 'superfish' view of the whole panosphere.
The line between the two points of the sector, where the arcs meet, is the hinge line. The hinge line always lies in a vertical plane through the center of the panosphere – the midplane. The two arcs can move independently, so a sector tool is not always symmetrical around the midplane. The left and right parts can act as one region, with power and form parameters that act similar to those of the spot effect; or it can be split into two regions with separate powers and form = 0. Power = 100 makes the area between the lines flat in the horizontal direction; in the vertical direction it curves to match the lines.
A normal sector flattens lines perpendicular to the midline, a split sector makes a sharp corner at the midline and flattens lines on both sides of that. When a sector is split, the last two sliders control powers in the left and right parts:
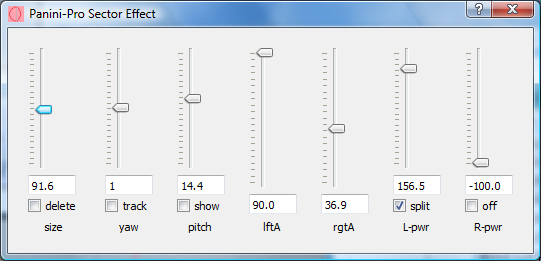
size sets the length of the hinge line, or equivalently its distance from panosphere center. The numerical value is degrees of angle, at sphere center, between the two end points.
yaw sets the horizontal angle of the midplane from home position.
pitch sets the vertical angle, in the midplane, to the center of the hinge line.
lftA and rgtA swing the arcs, that form the two sides of the sector, around the hinge line. The numerical values are the angles of the arc planes from the midplane. Setting both angles to 90 degrees makes the sector round, like a spot.
L-pwr and R-pwr adjust the strength of the effect in the left and right arcs. When the sector is not split, the last control is form instead of R-pwr.
The other check boxes work the same as for the spot tool.
Here is a split sector tool being used to flatten the sides of a of a building in corner-on view:

To correctly re-project an image, the original projection must be known. Panini-Pro can load many different kinds of images, and has a lot of machinery for determining their projections. The “Source Projection” dialog is your main interface to that machinery.
Basically a source image is either a photo, made by a physical lens, or a pano, made by image processing software. The big difference is that lens projections must be determined experimentally while pano projections have standard mathematical forms. Many photo files contain metadata, that Panini-Pro can use to find the right projection in its database of camera and lens characteristics. It also has a universal lens model (“ULM”) for use when there is nothing suitable in the database (the database will be empty when you first install Panini-Pro, because it is meant for you to load with information about your own equipment).
Panini-pro automatically recognizes two common pano formats, cubic and 360x180 degree equirectangular. For others (or when Panini-Pro guesses wrong) you use the Source Projection Dialog to select the projection and set its parameters. It pops up when you load an image whose projection Panini-Pro can't guess; or you can bring it up at any time with the tool bar button that looks like a camera. It presents controls appropriate to the kind of input file (photo or pano) and the currently chosen projection. Here is a typical case.

The top row of controls lets you save projection settings and get them back later. In fact when you dismiss the dialog with the OK button, the setting then in effect is automatically saved under the name <latest>. The list box in the middle holds the names of the saved settings. You can save the current setting by selecting the first item on the list, <new setting>, typing a new name over it and hitting Enter. Selecting any other item restores a saved setting. To remove a saved setting, select it then click the “delete setting” button.
Your main tools are the two drop-down lists on the third row of the dialog. The left-hand list chooses either the set of standard projections, or a camera from the data base; the right hand list shows the available standard projections, or the lenses associated with the selected camera. Selecting a camera and lens fills two more lists with the camera's image formats and the known calibrations for the lens. The buttons on the second row give access to detailed editors for the camera and lens databases. The use of the database is too complex to cover in this Quick Start Guide, please refer to the Manual.
The standard projections include 8 standard pano projections and 3 ULM-based camera models. All except the cubic projection have adjustable parameters, controlled by sliders that appear in the lower part of the dialog window according to the selected projection.
The first parameter for all pano projections is the horizontal field of view, hFOV. Most also have a control for the vertical field of view, vFOV. hFOV and vFOV are normally locked together to keep the pixel aspect ratio constant no matter which of them you adjust. By default they are locked at a pixel aspect ratio of 1:1, indicated by the check in the “square” box under hFOV. If you uncheck that box, you can adjust the fovs separately to get any aspect ratio you want.
The cylindrical projections, which include equirectangular, cylindrical, Mercator and the two slit camera types, have a Tilt parameter that represents displacement of the true projection center from the 'equator' of the image. This is useful for partial equirectangular projections as well as conical slit camera images.
The generic camera projection can closely match any photo made with real lens. The first parameter, EFL, is the 35-mm equivalent focal length of the lens, which is equal to the physical focal length times the 'crop factor' of the camera.
The Curve, CorrA and CorrB sliders of the camera projection control the universal lens model. Curve sets the basic shape of the lens projection in a continuous range from rectilinear (Curve = 0) through stereographic (1) and equal-angle spherical (2) to equal-area spherical (3). Between the whole-number values the curve is a mixture of the adjacent simple curves. In general, set Curve near 0 for a normal lens or near 3 for a fish-eye lens; however certain lenses are better fit by intermediate values. The CorrA slider adds a small correction that corresponds roughly to the 'b' or 'barrel' correction in Hugin or PTGui. CorrB makes an even smaller adjustment of the relative strength of the correction near to and far from image center. It is difficult to set these corrections by eye, but possible if the picture contains plenty of vertical straight lines and you are willing to give some time to it. Use the Source Orientation tool, first of all to align the verticals (roll and pitch) then with its yaw control, position various verticals under the red reference line. You can then judge their straightness pretty well. Try to find the settings of FOV, Curve, CorrA and CorrB (adjusting them in that order) that make lines at all distances from center as straight as possible.
Panini-Pro loads image files into OpenGL texture images, whose size is limited by the amount of video RAM available. The availability of system RAM may also limit the loadable image size. It is not easy to determine these limits, so Panini-Pro relies on two system-specific settings.
Maximum cube face width defines the largest cubic texture size
Maximum flat image size (pixels), as a percentage of maximum cube size
The initial default values are set low, to accommodate the lowest-end systems on which Panini-Pro might be able to run, so you will probably want to increase them right after installing Panini-Pro. Newer systems, that support OpenGL 3.2 or DirectX 11, should easily handle cube face width 3500 and flat size 100% .
To adjust the limits to suit your system, click the help button (?) and select 'tune image size limits...'. Set a new cube width or flat size percentage and click test. If a test image loads without error, Panini-Pro will save the new value as its permanent setting. If you just want to try new settings on some real images, without making them permanent, enter the new settings and click OK without clicking the test button; the new settings will be used until you restart Panini-Pro.
It takes more resources to load a flat panorama than a cubic one of the same size, so when the maximum cube size is set high, it may be necessary to use a lower limit for flat images. But if you don't choose to push for the absolute maximum cube size, you can leave the flat limit at 100%.